Convert Power Platform Plugin projects to SDK-style
Modernize legacy Dataverse plug‑in projects by converting them to SDK‑style .csproj files. This format is required for packages, simplifies project files, improves package management, and the post shows how to migrate.
Microsoft Dataverse plug‑in packages require that every project compiled into the NuGet package be an SDK‑style project. The Power Apps documentation warns that a plug‑in package must only contain custom assemblies built from a project file that includes a Project element with an Sdk attribute (for example ). Failure to use an SDK‑style project causes the Plug‑in Registration tool to reject the package. The CLI (pac plugin init) and Visual Studio templates already create SDK‑style projects by default, but many existing plug‑in projects still use the older MSBuild format. Let me explain why the SDK‑style format matters, and show how to convert a legacy plug‑in project to the SDK‑style format.
Why use SDK-style projects?
Modern SDK‑style projects (available since .NET Core 1.0/Visual Studio 2017) simplify the MSBuild project system. Instead of explicitly listing every Compile, None and EmbeddedResource item in the project file, the .NET SDK defines default includes and excludes. Files under the project directory with the appropriate extension are automatically compiled; this makes the project file smaller and easier to understand. The SDK format is much leaner than older .csproj files and uses smart defaults and globbing patterns (e.g., **/*.cs) so that earlier MSBuild files can be reduced to a dozen lines of XML plus package references.
There are other benefits too:
- Improved NuGet package management – Package references move from a separate packages.config file into
<PackageReference>elements. This allows you to manage all dependencies in one place and get an uncluttered view of top‑level dependencies. Using PackageReference makes updating package versions easier because you edit the project file directly. You can also benefit from central package management. - Multi‑targeting and CLI support – SDK projects allow you to specify multiple target frameworks (e.g.,
net462;net8.0) in a single file and produce builds for each framework . Because they are designed for the dotnet CLI, you can run commands likedotnet build,dotnet testanddotnet packdirectly without relying on Visual Studio. This might become more useful for Power Platform developer when Microsoft starts supportingnet48in future. - Easier porting to modern .NET – Microsoft recommends upgrading the project file to the latest SDK format even if you cannot yet migrate from .NET Framework to .NET. Upgrading provides a solid basis for future porting and modernization. The porting documentation echoes this advice: even if you stay on .NET Framework, you should still upgrade the project file.
- Better plugin packaging support – The SDK‑style format is now required for plug‑in packages. A Dataverse plug‑in project created with
pac plugin initincludes aPowerAppsTargetsPathproperty pointing to special MSBuild targets and uses the SDK format by default. Without this structure the Plug‑in Registration tool will display a “file cannot be found” error.
For a more complete comparison between the legacy csproj and the SDK-style format refer to this official comparison
Options for converting plugin-projects
- Create a new SDK‑style project with the Power Platform CLI.
- Convert using GitHub Copilot in Visual Studio.
- Manually convert to SDK-Style
- Manually convert to SDK-Style package
- Use a conversion tool.
1. Create a new SDK‑style project with the Power Platform CLI
The simplest way to get an SDK‑style plug‑in project is to let the tools do it. Running pac plugin init in an empty folder generates a Visual Studio Class Library project targeting .NET Framework 4.6.2. The generated .csproj contains the declaration, sets the to net462 and includes a <PowerAppsTargetsPath> property that imports Power Apps build targets. This template also adds a ProjectTypeGuids property so that Visual Studio recognises the project as a Dynamics plug‑in.
If you start a plug‑in project from scratch, this option is ideal. The project file also includes items for Microsoft.CrmSdk.CoreAssemblies and Microsoft.PowerApps.MSBuild.Plugin packages (private assets) and a PackageId, Version, Authors and other NuGet metadata. Because the CLI uses the SDK‑style template, your plug‑in package is ready for registration without additional modifications.
2. Convert using Github Copilot in Visual Studio
- Make sure all your git changes are either committed or discarded. You should have no uncommited change.
- Right click on the project / solution in the Solution Explorer and select Modernize.
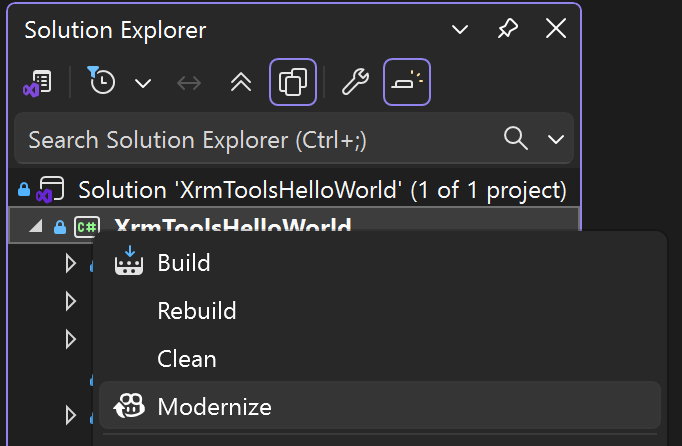
- Select "Explore more modernization options" as your prompt. If this option is not available, just type "convert project files to sdk-style" prompt. This will trigger the upgrade process.
- Copilot will take you through an assessment, planning and execution. Each stage will produce a MarkDown file that you will need to review and confirm before the next stage starts. You will go to next stages with prompts like these:
- "Continue with assessment" which will result in assessment document .github/upgrades/assessment.md.
- Then, "Proceed to Planning stage" that will lead to .github/upgrades/planning.md.
- Then you will be give a choice between "automatic conversion" and "step-by-step conversion".
- Then you will confirm using "Proceed to Execution stage" prompt. This will lead to ".github/upgrades/tasks.md".
- Finally, with your "Proceed with execution tasks" prompt, the AI agent will use the upgrade tool in VS to convert your project(s).
3. Manually Convert to SDK-style
If you have an existing plug‑in project that uses the old MSBuild project format, you can convert it manually. Here is a typical legacy .csproj file:
<?xml version="1.0" encoding="utf-8"?>
<Project ToolsVersion="15.0" DefaultTargets="Build"
         xmlns="http://schemas.microsoft.com/developer/msbuild/2003">
  <PropertyGroup>
    <Configuration Condition=" '$(Configuration)' == '' ">Debug</Configuration>
    <Platform Condition=" '$(Platform)' == '' ">AnyCPU</Platform>
    <ProjectGuid>{DAD9DB42-1111-4E3E-887B-123456789ABC}</ProjectGuid>
    <OutputType>Library</OutputType>
    <RootNamespace>SamplePlugin</RootNamespace>
    <AssemblyName>SamplePlugin</AssemblyName>
    <TargetFrameworkVersion>v4.6.2</TargetFrameworkVersion>
    <SignAssembly>true</SignAssembly>
    <AssemblyOriginatorKeyFile>SamplePlugin.snk</AssemblyOriginatorKeyFile>
  </PropertyGroup>

  <!-- References and packages defined manually -->
  <ItemGroup>
    <Reference Include="Microsoft.Crm.Sdk.Proxy">
      <HintPath>..\packages\Microsoft.CrmSdk.CoreAssemblies.9.0.2\lib\net462\Microsoft.Crm.Sdk.Proxy.dll</HintPath>
    </Reference>
    <Reference Include="Microsoft.Xrm.Sdk">
      <HintPath>..\packages\Microsoft.CrmSdk.CoreAssemblies.9.0.2\lib\net462\Microsoft.Xrm.Sdk.dll</HintPath>
    </Reference>
    <Compile Include="Plugin.cs" />
    <Compile Include="Properties\AssemblyInfo.cs" />
  </ItemGroup>

  <!-- Explicit import of C# build targets -->
  <Import Project="$(MSBuildToolsPath)\Microsoft.CSharp.targets" />
</Project>
To convert this project to the SDK-style format:
- Right click on your
packages.configfile in the Solution Explorer in Visual Studio and select Migrate packages.cofig to PackageReference.... - Use the following template and copy all your
<ReferencePackage>elements over it.
<Project Sdk="Microsoft.NET.Sdk">
  <PropertyGroup>
    <OutputType>Library</OutputType>
    <SignAssembly>true</SignAssembly>
    <AssemblyOriginatorKeyFile>key.snk</AssemblyOriginatorKeyFile>
    <TargetFramework>net462</TargetFramework>
    <GenerateAssemblyInfo>false</GenerateAssemblyInfo>
  </PropertyGroup>
  <ItemGroup>
    <PackageReference Include="Microsoft.Bcl.AsyncInterfaces" Version="8.0.0" />
    <PackageReference Include="Microsoft.CrmSdk.CoreAssemblies" Version="9.0.2.60" />
    <PackageReference Include="System.Buffers" Version="4.5.1" />
    <PackageReference Include="System.Memory" Version="4.5.5" />
    <PackageReference Include="System.Numerics.Vectors" Version="4.5.0" />
    <PackageReference Include="System.Runtime.CompilerServices.Unsafe" Version="6.0.0" />
    <PackageReference Include="System.ServiceModel.Http" Version="4.10.3" />
    <PackageReference Include="System.ServiceModel.Primitives" Version="4.10.3" />
    <PackageReference Include="System.Text.Encodings.Web" Version="8.0.0" />
    <PackageReference Include="System.Text.Json" Version="8.0.5" />
    <PackageReference Include="System.Threading.Tasks.Extensions" Version="4.5.4" />
    <PackageReference Include="System.ValueTuple" Version="4.5.0" />

    ... add your package references here!

  </ItemGroup>
</Project>
4. Manually Convert to SDK-style package
While converting your project into SDK-style format, you can also take the opportunity to convert it into a depdendent assembly. This means that if you have external libraries in your project that you are fusing into the final DLL during built - which is an unsupported technique - you can now, include them as dependenct assemblies, just like any other <PackageReference>.
To convert this project to the SDK-style format:
- Right click on your
packages.configfile in the Solution Explorer in Visual Studio and select Migrate packages.cofig to PackageReference.... - Create a new plugin project using
pac plugin initcommand. We will use it as a template. - The new plugin
.csprojfile will look like the following. You will need to copy your<PackageReference>elements from your old project to the new one and make sure name, description and namesapce are correct.
<Project Sdk="Microsoft.NET.Sdk">

  <PropertyGroup>
    <TargetFramework>net462</TargetFramework>
<PowerAppsTargetsPath>$(MSBuildExtensionsPath)\Microsoft\VisualStudio\v$(VisualStudioVersion)\PowerApps</PowerAppsTargetsPath>
    <AssemblyVersion>1.0.0.0</AssemblyVersion>
    <FileVersion>1.0.0.0</FileVersion>
    <ProjectTypeGuids>{4C25E9B5-9FA6-436c-8E19-B395D2A65FAF};{FAE04EC0-301F-11D3-BF4B-00C04F79EFBC}</ProjectTypeGuids>
  </PropertyGroup>

  <Import Project="$(PowerAppsTargetsPath)\Microsoft.PowerApps.VisualStudio.Plugin.props" Condition="Exists('$(PowerAppsTargetsPath)\Microsoft.PowerApps.VisualStudio.Plugin.props')" />

  <!--
    NuGet pack and restore as MSBuild targets reference:
    https://docs.microsoft.com/en-us/nuget/reference/msbuild-targets
  -->
  <PropertyGroup>
    <PackageId>test1</PackageId>
    <Version>$(FileVersion)</Version>
    <Authors>Reza Niroomand</Authors>
    <Company>MyCompany</Company>
    <Description>This is a sample nuget package which contains a Dataverse plugin and its runtime dependencies like Newtonsoft.Json</Description>
  </PropertyGroup>

  <ItemGroup>
    <PackageReference Include="Microsoft.CrmSdk.CoreAssemblies" Version="9.0.2.*" PrivateAssets="All" />
    <PackageReference Include="Microsoft.PowerApps.MSBuild.Plugin" Version="1.*" PrivateAssets="All" />
    <PackageReference Include="Microsoft.NETFramework.ReferenceAssemblies" Version="1.0.*" PrivateAssets="All" />

    ... add your package references here.

  </ItemGroup>

  <Import Project="$(PowerAppsTargetsPath)\Microsoft.PowerApps.VisualStudio.Plugin.targets" Condition="Exists('$(PowerAppsTargetsPath)\Microsoft.PowerApps.VisualStudio.Plugin.targets')" />
</Project>
3. Use a conversion tool
For larger solutions with many projects, manual conversion can be tedious. The open‑source Project2015To2017 CLI (Project2015To2017.exe), also available as the NuGet tool Project2015To2017.Cli, converts legacy projects to SDK style. Derek Comartin suggests using this tool because it can handle most scenarios automatically and will get your project files about 80 % of the way there, after which you can clean up any remaining issues . Scott Hanselman also recommends using such tools when dealing with dozens of projects . Remember to compare the converted file to a fresh project created with pac plugin init to avoid importing unnecessary cruft.